Intro To Real Time Operating Systems
October 26, 2020 • 9 min read
Read this post to get a kickstart to OS development with Real-Time Operating Systems by understanding what is RTOS and how run it.
All of us have used Operating Systems like Windows, Mac or a Linux distribution. I am sure you have wondered about the efforts that must have gone into implementing a system like this or maybe thought, “Oh I wish I could improve this, but how do I start with even understanding such a complex system”. I have good news for you; after reading this blog, you will have a starting point to OS development.
Motivation
OS development in itself sounds a nice and cool but it seems so difficult at first. I realised how fun it is after working on my thesis to develop a complete network stack for an OS.
I found OS development has the following advantages with :
- Become proficient in low-level languages like C
- Practical applications of theory for those who have taken courses like OS and faster grasping of concepts for others
These are just a few from the top of my mind, but a fair warning, you probably won’t be able to improve to Windows anyways for apparent reasons.
Prerequisites
The purpose of this blog is to inspire more people to start OS development regardless of their conceptual understanding of complex operating systems. However, it is better if you have preliminary knowledge of the following:
- Compiling and Running C code with features like macros (preprocessing directives to make code smaller and more generic)
- Makefile (a build automation tool to compile your code automatically with the set of rules defined in the file)
- GitHub
Theory
Before we go into the details of Operating Systems and their development, let me give a brief introduction to Process Scheduling. Readers who know this concept can skip this section.
Every task sent from one of the programs to the Processing Unit of the Computer has two major components, namely, IO and CPU parts. After doing the CPU part of the task, the CPU would essentially be ideal; therefore, to improve the overall efficiency, a scheduler is present to schedule the tasks as they come. In layman’s terms, it decides what process will run on the CPU at a particular point in time. This part of the OS is called a process scheduler. The figure below shows an example of a simple process scheduler.

Process scheduler [3]
You can read more on this blog.
Operating Systems
The operating systems, as we know today, are way too complicated as beginners to work on, especially with the limited knowledge we have from our undergrad courses like Operating Systems, Computer Networks and DSA. Therefore here, I will introduce you to Operating Systems designed for low power embedded systems called Real-Time Operating Systems (RTOS). Since the OS runs on hardware with limited resources(low memory and power), it has a reasonably simple construct which in-turn makes understanding the code and contributing to it much more manageable. For example, these operating systems do not need complex process schedulers due to the relative simplicity of the applications running on them.
In this blog, I will be talking about RIOT OS, which is a developing, Open-source RTOS.
RIOT OS
The most salient features of this operating system are:
- Can run on hardware with RAM and ROM as low as 1.5kB and 5kB respectively!
- Support to over 100 different embedded device boards which makes it highly versatile and generic
- Minimal hardware-dependent code
- Code on Linux or Mac OS natively(explained later in the blog), deploy on embedded device
- Highly active community with ~25 commits every day
- Highly experienced people working on development, researchers from renowned Universities in France and Germany, so they know what they are doing
- Conducive and active contributor community, hence providing a nurturing environment for new contributors
- The best, its Open-Source, so you can modify the code for free and even contribute to it
So, now let’s delve into the operating system with a small introduction to the OS itself and then I will show you how to run a user application on the OS designed for IoT devices.
RIOT OS Structure
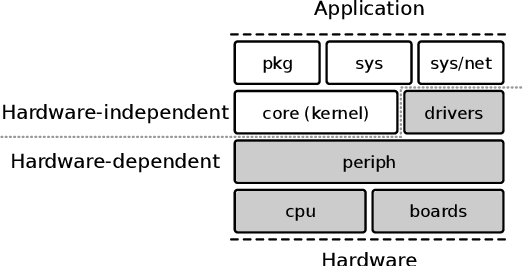
RIOT Structure [2]
The Image above gives an overview of RIOT structure which shows that RIOT OS, like any other RTOS, is logically divided into the following categories:
- Core/kernel: Implements the basic data structures and heart of the OS
- Hardware: Implements the abstraction to interact with a micro-controller, hardware devices like radio devices, sensors, etc. The component includes CPU specific implementations, configuration for different boards which use those CPUs, supporting peripheral implementations like real-time clocks and drivers of various sensors.
- System functionalities: Implements system libraries which are not part of the basic kernel like networking and file system
- Packages: Implements support for all additional external libraries which are not a part of OS code
- Applications: Implements high-level logic for use in actual applications.
Don’t worry if you don’t exactly get what each component gets just yet. You will understand it as you work your way into the code and reach the registers on the micro-controller.
Remarkable features of RIOT OS
The user applications in RTOS are compiled and directly linked with the Operating System’s code into one binary. This helps reducing final binary size, which is beneficial since the MCUs have low memory. This feature is in contrast to our traditional operating systems where we can run the application on top of the OS.
Now, the next question that comes to mind is that as a software developer how could you work on an Operating System that runs on separate hardware(micro-controller) which you may not want to buy (at least initially). RIOT developers have an excellent solution for this which simulates the hardware to run on your PC natively(more on this when we go through the example later in the blog). Also, there is an open-source test-bed on which one can openly deploy their code for testing at FIT IoT-Lab.
Another fantastic thing about the operating system is how the code design and the build system work together to make each module easily swappable. For example, if the user application only needs the shell, they only need to include the module corresponding to shell in the user application Makefile.
RIOT OS has tickless priority-based scheduler. It is a very primitive scheduler where the scheduler does not schedule processes according to time spent by the process on CPU. Instead, schedules processes according to the processes’ priority. For example, the scheduler will schedule the process with lower priority (say, priority 5) only after all the higher priority processes(processes with priority 1-4) have finished executing. Such a primitive scheduler is there to reduce the complexity of the final system again due to limited computing resources (low computing power of the MCU). If you are interested to know more about how priority scheduling works, you can watch the video.
Default Example of RIOT
Setting up your PC
So, the first task would be to get your pc ready to compile, flash (on an external hardware board, if any) and run the operating system. For this, you can follow the Tutorials provided on their website [1]. You would be installing essential tools like git, make, gcc, openocd (an open-source tool for debugging and flashing micro-controllers) and a cross-compiler which works with gcc to compile the code for arm based embedded devices.
Example explained
After installing all the dependencies and cloning OS code from GitHub, you should go to the ./examples/default directory in the riot folder which is a primitive example of application code running on the OS. We will use this default example as a reference in this blog. All the folders inside the examples folder represent example user applications running on the OS. There are two main components here, namely main.c and Makefile. The main.c file contains user application code. The Makefile is a file with some set of directives(rules stating to include some particular modules of the operating system) utilising make build tool(this tool essentially automates the compilation process) to generate the final binary.
#include "thread.h"
#include "shell.h"
#include "shell_commands.h"

#ifdef MODULE_NETIF
#include "net/gnrc/pktdump.h"
#include "net/gnrc.h"
#endif

int main(void)
{
#ifdef MODULE_NETIF
    gnrc_netreg_entry_t dump = GNRC_NETREG_ENTRY_INIT_PID(GNRC_NETREG_DEMUX_CTX_ALL,
                                                          gnrc_pktdump_pid);
    gnrc_netreg_register(GNRC_NETTYPE_UNDEF, &dump);
#endif

    (void) puts("Welcome to RIOT!");

    char line_buf[SHELL_DEFAULT_BUFSIZE];
    shell_run(NULL, line_buf, SHELL_DEFAULT_BUFSIZE);

    return 0;
}
Default example main.c
The image above shows the main.c file which includes some header files specific to the operating system like thread.h, shell.h and shell_commands.h and main function which only does two things,
- Initialises some network related things (
MODULE_NETIFdenotes module corresponding to network interfaces) - Initialises the shell by the
shell_runcommand at line 48
# name of your application
APPLICATION = default

# If no BOARD is found in the environment, use this default:
BOARD ?= native

# This has to be the absolute path to the RIOT base directory:
RIOTBASE ?= $(CURDIR)/../..

# Modules to include:
USEMODULE += shell
USEMODULE += shell_commands
USEMODULE += ps

include $(RIOTBASE)/Makefile.include
Default example Makefile
In addition to the main.c file, we have the Makefile (shown in the image above).
For this example, note the following:
- The
BOARDvariable defines what hardware board is the code to be compiled for, which in this case is native. Native is a simulated board in RIOT which runs the OS code on your PC imitating MCU’s functionality. Thus, the code runs smoothly on the computer without any external board USEMODULEdefines which components of the Operating System apart from the kernel have to be compiled for the user application to work. This ability to choose specific elements of the operating system only to be compiled into the final binary facilitates reducing of the binary size drastically thereby making it suitable to be deployed on resource-constrained devices (devices which have RAM as low as 1.5kB)
Since binary of the operating system is compiled around the user application in case of embedded Operating Systems, only the components defined in Makefile are compiled with the core functionality of the operating system which is defined in the file $(RIOTBASE)/Makefile.include. For example, here, the networked communication components will not be compiled even if the OS supports such functionality since the Makefile does not have MODULE_NETIF present. As a result, the compiler will completely ignore and not compile the code corresponding to network interfaces between the #ifdef directives from line 12 to 16. Thus, helping reduce the size of the final binary and utilising the limited space on the microcontroller more efficiently. Thus in this specific application in question, we are only using shell commands; therefore, the OS will only compile the code corresponding to shell commands.
Run the example
Now that the code is out of the way, the next question is how to run it. You can run the default example by compiling, flashing onto the board and connecting to it via this one command that does it all:
make clean flash term
You have to execute the command from the directory of the default example. We can understand the command as:
- make: compiles all the kernel code, modules defined in the
Makefileand links them into one single binary - clean: as the word says, it cleans the bin directory to get rid of stale code (Pro tip: clean every time, since sometimes some older compiled binary might mess around with your new code version and you would end up spending an entire day and not find the bug)
- flash: flashes the code on the hardware. In our example, we are using the native board so it wouldn’t flash the code, by default the OS uses
openocdto flash the code but some other flashing tools likeBOSSA - term: This connects to the serial output of the device and prints to the terminal(output of
printf()statements, etc.) usingpytermimplementation present inside./dist/tools/pytermin RIOT’s repository
Interact with the OS
Now that the code is running natively (or if you have hardware on which you can run this OS), you can interact with the OS via the shell on the serial connection which should look like :
RIOT native interrupts/signals initialized.
LED_RED_OFF
LED_GREEN_ON
RIOT native board initialized.
RIOT native hardware initialization complete.

main(): This is RIOT! (Version: 2020.10-devel-889-ga368b-drivers/sps30/add_sleep_mode)
Welcome to RIOT!
>
The first five lines denote the successful initialisation of native components.
Welcome to RIOT! represents the start of main.c code and then the shell starts running waiting for user input.
Typing help here in the shell should show options with which you can interact with the shell:
> help
help
Command              Description
---------------------------------------
reboot               Reboot the node
version              Prints current RIOT_VERSION
pm                   interact with layered PM subsystem
ps                   Prints information about running threads.
>
Since this is an elementary example with minimal functionality, you can only see a few options. But I hope you can understand how this is working. You can ignore things like pm, which is an abstraction layer to support power management functionalities of various MCUs.
This small example very seamlessly demonstrates the ease with which you could start using and developing on this OS.
Conclusion
In conclusion today, we learnt about the basics of the RIOT Operating system and how to start by compiling and flashing the code. I hope this provides a kickstart to understanding how operating systems are designed. I will post some more blogs shortly which add onto this blog and go in more details about development on this Operating System and creating and merging pull requests. I have used RIOT OS as a reference throughout this blog. Still, you could also consider exploring other Operating Systems also once you are familiar with Operating System code and how to approach solving problems in it.
References:
[1] RIOT Tutorials: https://github.com/RIOT-OS/Tutorials/blob/master/README.md
[2] “RIOT: An Open Source Operating System for Low-End Embedded Devices in the IoT” 13 Mar. 2018, https://ieeexplore.ieee.org/document/8315125/. Accessed 27 Sep. 2020.